Setting Up Your First DCA Assist
Written By Ehsaan XP
Last updated 4 months ago
Getting Started with SageMaster DCA
If you're new to automated cryptocurrency trading, setting up your first DCA (Dollar Cost Averaging) assist with SageMaster can significantly enhance your trading experience. This guide walks you through setting up a DCA strategy on the platform. You can choose between using a preset strategy (ready-made and optimized) or creating your own manual setup. This guide will walk you through the complete process of creating and configuring your first DCA assist, from connecting your exchange to optimizing your trading parameters.
Prerequisites
Before setting up your DCA Assist, ensure you have:
A SageMaster account
An account with a supported exchange (Binance, Bybit, or Bitget)
API keys from your exchange with trading permissions
Basic understanding of trading concepts (order types, stop loss, take profit)
Step 1: Connect Your Exchange
First, you'll need to connect SageMaster to your cryptocurrency exchange:
Log in to your SageMaster account
Navigate to the exchange connection section
Select your preferred exchange (Binance, Bybit, or Bitget)
Enter your API Key and Secret Key from the exchange
Test the connection to ensure everything is working properly
For Binance Users:
Log in to Binance and open the API Management page
Create a new API key and ensure trading permissions are enabled
Turn off "Default Security Controls for Unrestricted API Keys"
Copy the API Key and Secret Key
Paste them into the corresponding fields in SageMaster
Step 2: Choose between Preset Set up and Manual set up
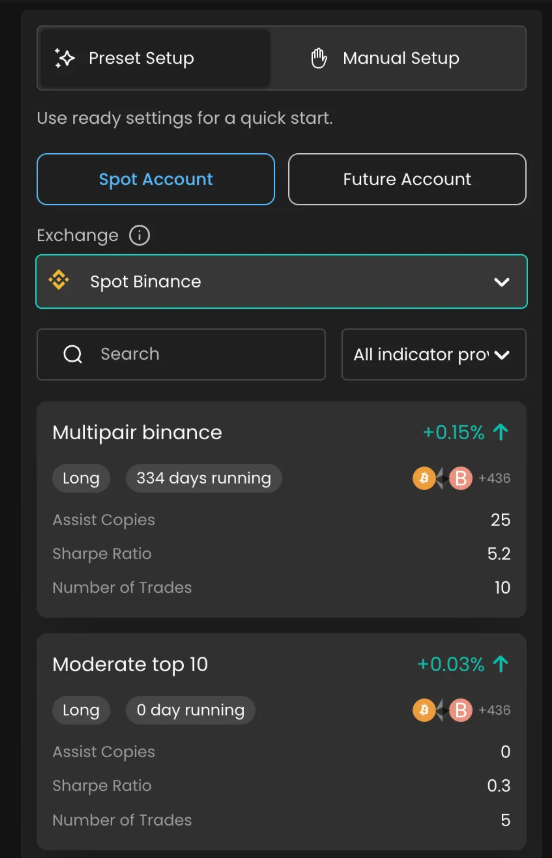
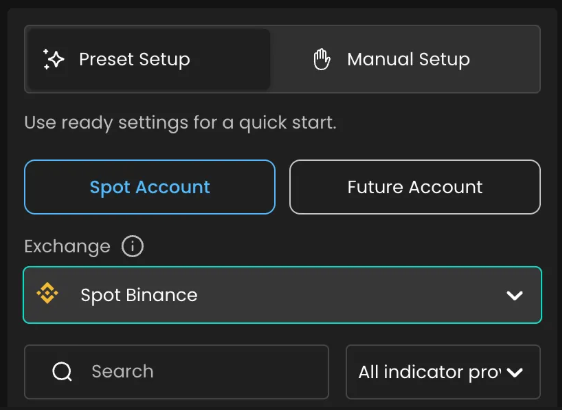
When you open the DCA creation page, you’ll see two main areas:
Left Side: A welcome and navigation panel that guides you through the setup steps.
Right Side: The DCA setup interface where you can configure or select presets.

Preset Setup vs. Manual Setup
When creating a DCA strategy, you can choose between Preset Setup and Manual Setup modes.
Both offer powerful ways to build automated trading strategies — the main difference lies in how much control and customization you want.
Preset Setup Mode
Preset Setup allows you to start quickly with ready-made DCA strategies that have already been optimized and tested by other traders or the platform’s AI.
You simply select a preset, review the key parameters, and start trading right away.
Best for:
New or beginner users who want to save time and rely on proven strategies.
Key Features:
Displays all presets with filters by selected exchange and provider
Includes filters for market type (Spot/Futures) and provider.
Requires minimal input — just select and launch.
Perfect for users seeking simplicity and quick setup.
Manual Setup Mode
Manual Setup gives you full control over every detail of your DCA strategy — from trade size and intervals to take-profit conditions.
This mode is designed for traders who want to experiment, backtest, or apply their own market logic.
Best for:
Experienced traders who prefer custom configuration.
Users testing unique trading ideas or niche market conditions.
Those who want to use AI Assist to optimize or simulate their own settings.
Key Features:
Manual control of all DCA parameters — entry points, order sizes, intervals, etc.
Integration with AI Assist for optimization and risk assessment.
Step-by-step configuration process for clarity.
Ideal for advanced customization and experimentation.
In Summary
Preset setup
Step 1: Choose Between Spot and Futures
Link: Types of DCA
Depending on your trading goals and risk tolerance, you'll need to decide whether to use spot or futures trading:
Spot Trading
Direct ownership of assets
No leverage (lower risk)
Suitable for long-term accumulation
Limited by your available capital
Futures Trading
Contract-based (no actual ownership)
Leverage available (higher risk/reward)
Can profit from both rising and falling markets
Requires careful risk management
Select the appropriate option in SageMaster based on your preference. For beginners, spot trading is generally recommended due to its lower risk profile.
Step 2: Review the backtest analytics and Configure AI Assist
After filtering and choosing the strategy, you have the ability to review the Backtest stats (Remember: The past result is not guaranteed for the future)
Click the Configure AI Assist
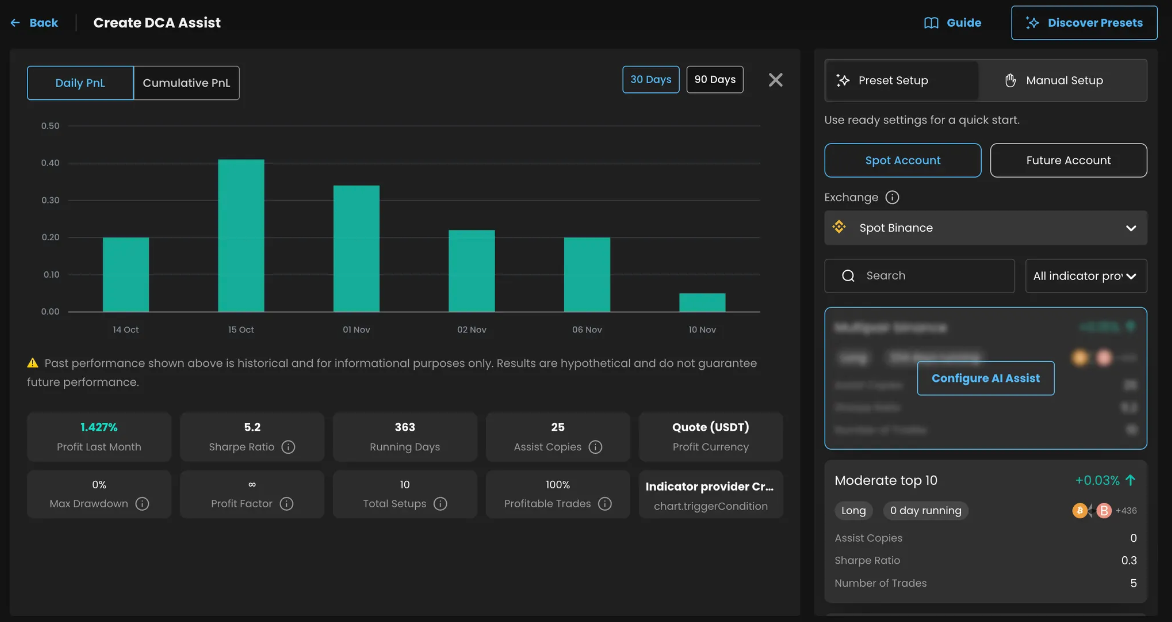
Enter the base required settings: Base order amount, Extra order amount, Max active deals, Leverage (if you are choosing trading with Futures)
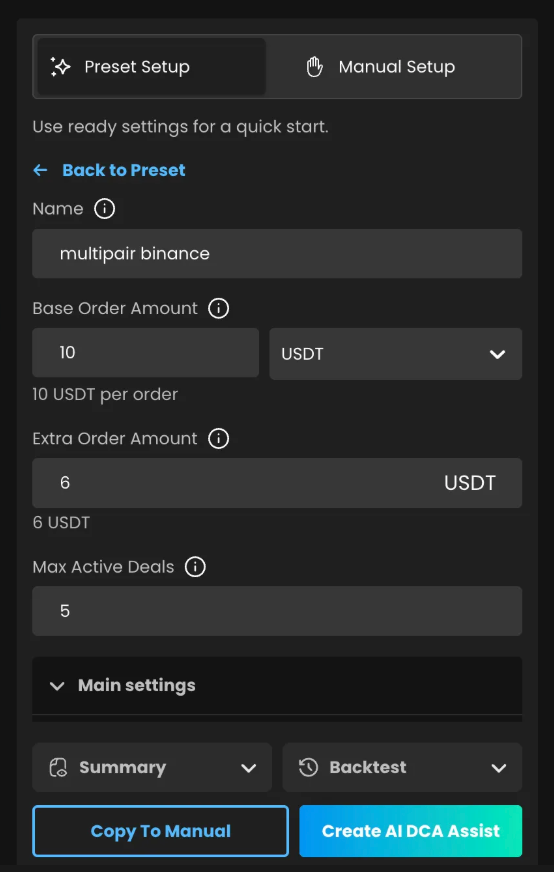
Review the other settings and click Create AI DCA Assist

You can always switch to Manual setup if you want to change some settings
Manual Setup
Step 1: Choose Between Spot and Futures
Step 2: Configure Main DCA Settings
Now it's time to set up the core parameters of your DCA Assist:
Navigate to "Create DCA Assist" in the SageMaster interface
Configure the following settings:
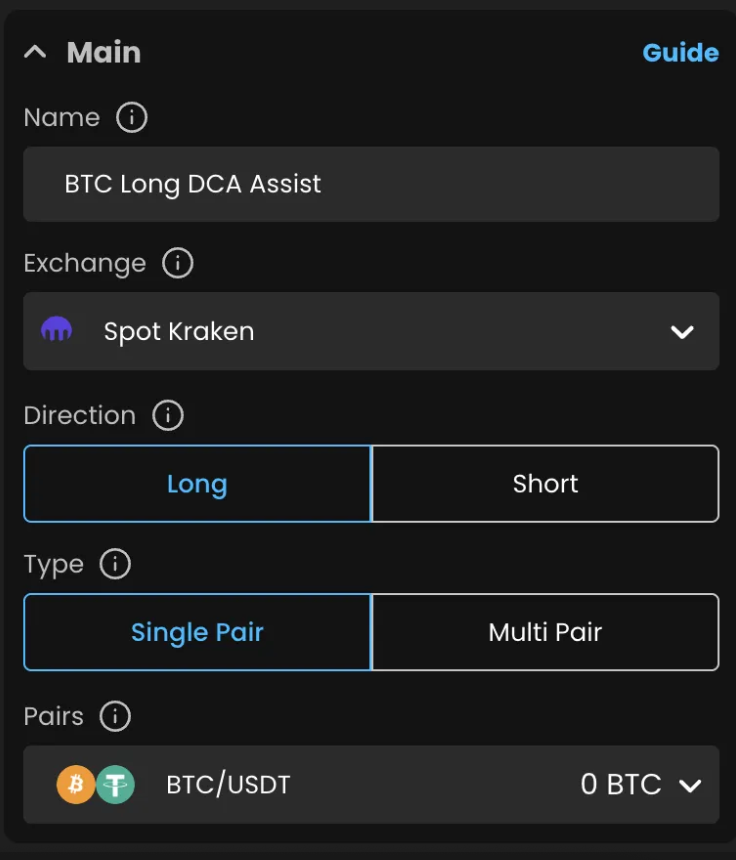
Name: Choose a short and clear name for your Assist to differentiate it easily from others.
Exchange: select the Exchange account where you want to configure your Assist
Direction: Select ‘Long’ when you want your assist to buy as prices dip and sell when they rise—ideal for bullish trends. ‘Short’ is for downtrends—your assist sells high and buys back lower.
Important: In Spot trading, you must already hold the coin to short it.
But in Futures, you don’t need to own the asset—it handles that for you.
Pair: Single Pair lets your assistant focus on just one trading pair. Multi Pair expands your strategy across several assets—diversifying your risk and increasing potential entries.
‘Use All Pairs’ ON, your assist will automatically track updates—adding new assets as they’re listed and removing them if they’re delisted. No manual updates needed.
Step 3: Strategy
These are the primary options for the main settings.
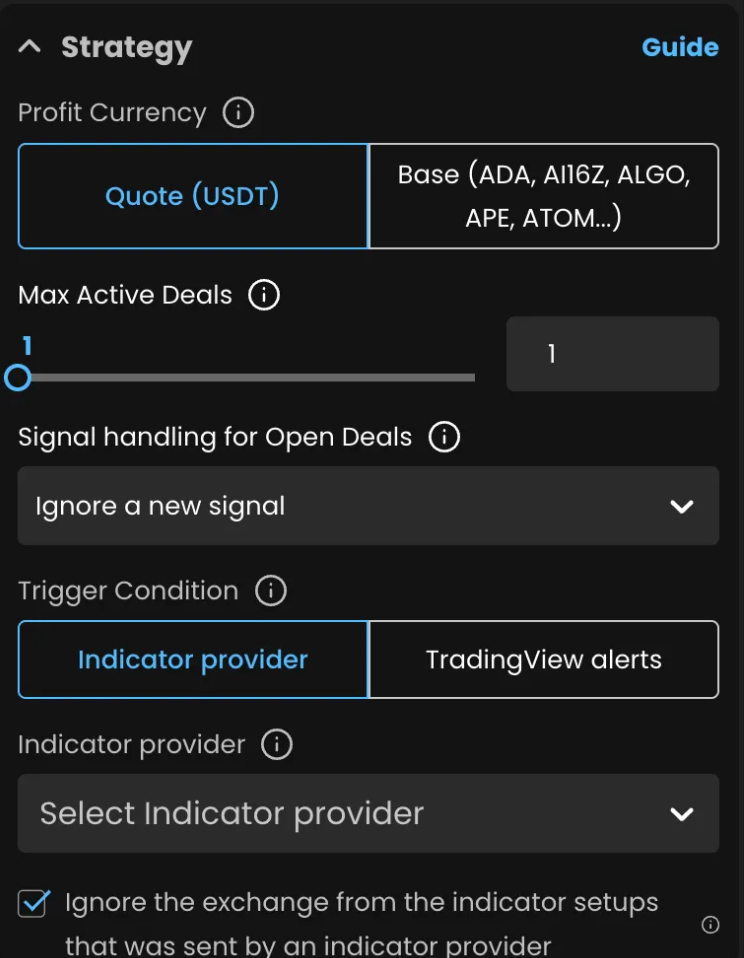
Profit currency
If your assist is set to Long, you’re buying coins with USDT.
Select Quote (USDT) if you want profits in USDT, or Base (e.g. BTC) if you want to grow your coin balance.
If you're running a Short assist, it's the reverse — you’re selling the coin to earn USDT.
In this case, Quote means profit in USDT, and Base would leave you with the coin.👉 Example:
Going Long on BTC/USDT with Quote selected means you’ll take profit in USDT.
Choosing Base means you’ll end up with more BTC after the trade.Max active deals: limit how many trades can run at once.
Signal Handling for Open Deals
If the multi-pair option is enabled in the Assist, there are 3 additional options available, setting up simultaneous deals for the same pair and specifying the maximum number of active deals the bot can operate at the same time.
Ignore a new signal: It won’t open a new trade.
Max concurrent deals for the pair: Set how many trades can run for the same asset.
Immediately route an extra order: Instead of starting a new deal, it adds more orders to the existing one—accelerating your DCA."
Trigger Condition Recap
Now, let’s look at how to set up your strategy’s trigger conditions.
In the Trigger Condition menu, you can choose either “Indicator Provider”, “Custom TradingView Alert”, or decide to start the trade instantly after creation
Selecting an Indicator ****Provider means your strategy will listen to that provider’s trade ideas and automatically open orders based on your chosen settings.
If you pick TradingView Alert, you’re building your own strategy logic — defining when to enter and exit trades using your own alerts. How to set up TradingView Alerts: Trading View Webhook Setup
Instant: This means that after starting the Assist, it will start the trade as soon as it can.
Step 4: Entry
In the entry order section, you can specify the size of the initial order that the Assist will use to open a trade. You can choose how the order amount is calculated in currency or as a percentage of your total account balance, allowing for flexibility and adaptation to your portfolio's current conditions

Leverage: Available only for futures -this lets you control a larger position with a smaller amount of capital, multiplying both potential profits and losses. 👉 Example: With $100 and 10x leverage, you can open a $1,000 position. If the price moves just 1% in your favor, that's a 10% gain—or a 10% loss if it moves against you.
⚠️ Be aware of your liquidation price—that’s the point where your position is force-closed to prevent further losses."Start Order type: Market or Limit
Configure Extra Orders
Extra orders are what make DCA trading powerful. They automatically route additional purchases as the price drops (for long positions) or rises (for short positions):
Enable Extra Orders in your strategy settings
Configure the following parameters:

Extra Order Parameters
Extra Order Amount: Amount to be used for each extra order
Price Deviation: Percentage drop/rise that triggers extra orders (e.g., 1%)
Deviation Step: How the deviation increases for subsequent orders (e.g., 1.2)
Max Orders: Maximum number of extra orders to place
Volume Step: How the size increases for subsequent orders (e.g., 1.5)
For beginners, start with conservative settings:
1-3 extra orders
1-2% initial price deviation
1.1-1.3 compound steps
Step 5: Exit Set Up Take Profit Strategy
Take Profit Calculation Mode
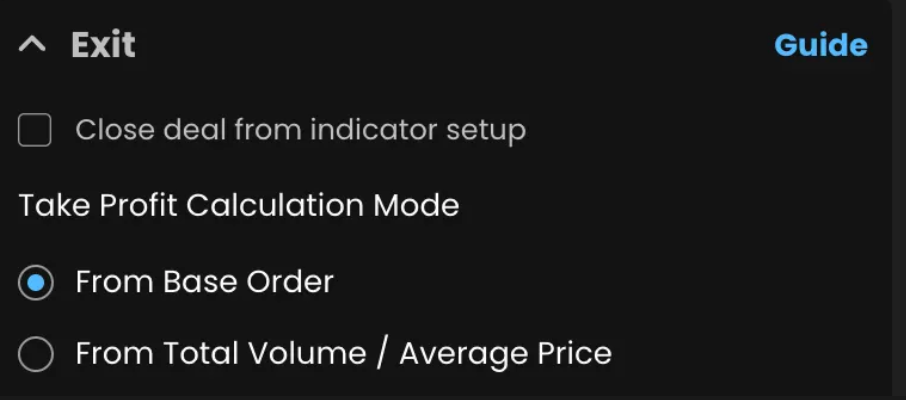
Choose how your TP % is calculated:
From Base Order: TP is triggered only when the price reaches the % target above your first entry price.
From Average Price: TP is triggered when price reaches the % target above the average price of your Base + Extra Orders.
Use Average Price for better performance in DCA strategies like QFL, where multiple entries are placed at lower prices and quick rebounds are expected.
Take profit settings determine when and how your Assist will exit profitable positions:
Fixed Take Profit

For more advanced exit strategies:
Select "Fixed Take Profit" option
Add multiple take profit levels (e.g., TP1: 1%, TP2: 2%, TP3: 4%)
Specify the percentage of your position to sell at each level
Optionally enable Smart Trailing to dynamically adjust stop loss as take profits are hit
Set All TP Ladder
to follow all the take-profit levels from your provider indicator.
👉 Example: If the provider indicator sends four levels—1.5%, 3%, 4.5%, and 6%—your assist splits the trade evenly across them.
This is great when you trust the provider’s full exit plan and want to follow it automatically.
Set Specific TP
With Set Specific TP, you pick just one level from the provider’s targets.
👉 Example: If the trade idea includes TP1 at 1.5%, TP2 at 3%, TP3 at 4.5%, and TP4 at 6%,
you can enter ‘3’ to set your full take profit at the third level—4.5%.
Progressive TP Ladder
Progressive TP Ladder lets you assign exactly how much to sell at each level.
👉 Example:
Level 1: 10%,
Level 2: 40%,
Final Level: 50%.
Perfect if you want early profit but still ride the trend.
Trailing Take Profit locks in gains while letting profits run.
👉 Example: Say your first TP is 2%, and trailing is set to 0.2%.
If price rises to 2.8% and drops to 2.6%, the assist closes the trade—securing profit at the peak."
Stop Loss
Protect your capital with Stop Loss. Choose from 3 types:
Fixed Stop Loss – You define the percentage.
👉 Example: -5% from entry.
From Indicator Setups in % – Copies the percentage from the trade idea.
👉 Example: -3% based on signal.
From Indicator Setups in Price – Uses a fixed price level from the provider.
👉 Example: Exit at $19,500 if price drops."
If trailing stop loss is enabled, the stop loss will automatically move in line with the price as it moves in your favor, allowing you to reduce losses or secure a profit if the trend reverses.

Step 3: Smart Settings (Optional)
For more experienced traders, consider configuring these smart features:
Smart Trailing
Move the Stop Loss to breakeven (0%) or a previously hit Take Profit level.
Minimum P&L
Specify the duration after which your TP expectations adjust. Setting different time thresholds enables you to strategize profits based on how long a trade has been active, accommodating shifts in market behavior over time
Breakeven
Set the price distance from your entry point to where the Take Profit should be routed. This defines the target profit point before the Breakeven Stop Loss adjustment is triggered.
Step 4: Review and Create Your Assist
Before finalizing your DCA Assist, carefully review all your settings:
Check your base order and extra order parameters for appropriate sizing
Confirm your take profit and stop loss levels align with your trading goals
Verify that your risk management settings provide adequate protection
Ensure you have sufficient funds in your exchange account to cover all potential orders
Once you're satisfied with your configuration:
Click "Create AI Assist" to finalize your Assist
Your Assist will now be visible in your SageMaster dashboard
Monitor its performance regularly and make adjustments as needed
Step 5: Monitor and Optimize Your DCA Assist
After your assist is up and running, it's important to monitor its performance and make adjustments as needed:
Performance Monitoring
Check your dashboard regularly to view open positions and completed trades
Look for patterns in winning and losing trades
Pay attention to how often extra orders are triggered and whether they improve performance
Strategy Optimization
Based on your assist's performance, consider making these adjustments:
Adjust take profit levels based on market volatility
Fine-tune extra order parameters if they're triggering too frequently or not enough
Modify stop loss settings based on your risk tolerance and market conditions
Test different trigger conditions to find the most effective approach
Using the DCA Backtest Feature
To improve your strategy without risking real capital, use SageMaster's DCA Backtest feature, more info here: DCA Backtest Guide
Configure your strategy settings as desired
Click the "Backtest" button in the DCA creation interface
Review metrics like Total Return %, Max Drawdown %, Win Rate %, and Profit Factor
Make adjustments and run additional backtests to compare results
This iterative process helps you optimize your strategy before deploying it with real capital.
Best Practices for New DCA Traders
Start Small
Begin with smaller position sizes until you're comfortable with how the system works and confident in your strategy.
Stay Conservative Initially
Use moderate leverage (if using futures)
Set reasonable take profit targets
Keep extra order parameters conservative
Implement proper stop losses
Diversify Your Approach
Consider running multiple DCA Assists with different strategies or on different pairs to diversify your risk.
Continuous Learning
The cryptocurrency market evolves rapidly. Stay informed and be prepared to adapt your strategies accordingly.
Troubleshooting Common Issues
If you encounter issues with your DCA assist, check these common problems:
"Not enough money" error
Ensure you have sufficient funds in your exchange account
Check that your base order and extra order sizes are appropriate for your balance
Consider reducing leverage if using futures trading
More common errors can be found here: FAQ
Conclusion
Setting up your first DCA assist with SageMaster is an exciting step toward more systematic and emotionally controlled trading. By following this guide and starting with conservative settings, you can begin to harness the power of automated DCA trading while minimizing risks.
Remember that no trading strategy is guaranteed to be profitable, and markets can be unpredictable. Continue to learn, adjust, and optimize your approach based on results and changing market conditions.
Happy Trading! 📈
The SageMaster Team